• About

enjolivure

~ embellishments for digital scrapbooking and more

enjolivure

Category Archives: Scrapbooking

12-Block Scrapbooking

14 Saturday May 2016

Posted by Enjolivure in Scrapbooking

≈ Leave a comment

Fullscreen capture 5142016 54647 PM.bmp

I decided to simplify my scrapbooking this year and make all my pages based on a 12-element grid. The instructions will explain how to make two different grids – one with portrait photos (vertical) and one with landscape photos (horizontal). Once you create the 12 elements on your page (choose whichever one will suit your needs better), you can stretch out the elements to also suit your needs.

  1. Insert a rectangle shape. Landscape size: 10.5 wide x 10.7 high. Portrait size: 10.3 wide and 10.9 high.
  2. Cut, Grid, Spacing = 3. Landscape: 3 across, 4 down. Portrait: 4 across, 3 down
  3. Select your binding under View.
  4. Group the 12 elements together and center the grouping on the page. Ungroup.
  5. To change a shape into a photo: Right click on each element, Fill, Convert to photo drop unless you want to decorate the element and/or add a text box for journaling or a title.
  6. Resize the photo drops as needed. As you stretch the elements (grab and drag the little boxes around the perimeter), green lines will appear (if you have the Artisan 5.0) and you will easily see when one photo has taken up the spaces for 4 photos or however many you want to stretch it to. Delete the photos that have been covered and are no longer needed.
  7. Add a background, decorate, journal as usual.
  8. Once the two pages have been created with 12 blocks each, copy them and edit as needed.
Fullscreen capture 5142016 60500 PM.bmp
Fullscreen capture 5142016 52214 PM.bmp

The configurations are many! Here are a few that I plan to use:

Fullscreen capture 5142016 53148 PM.bmp

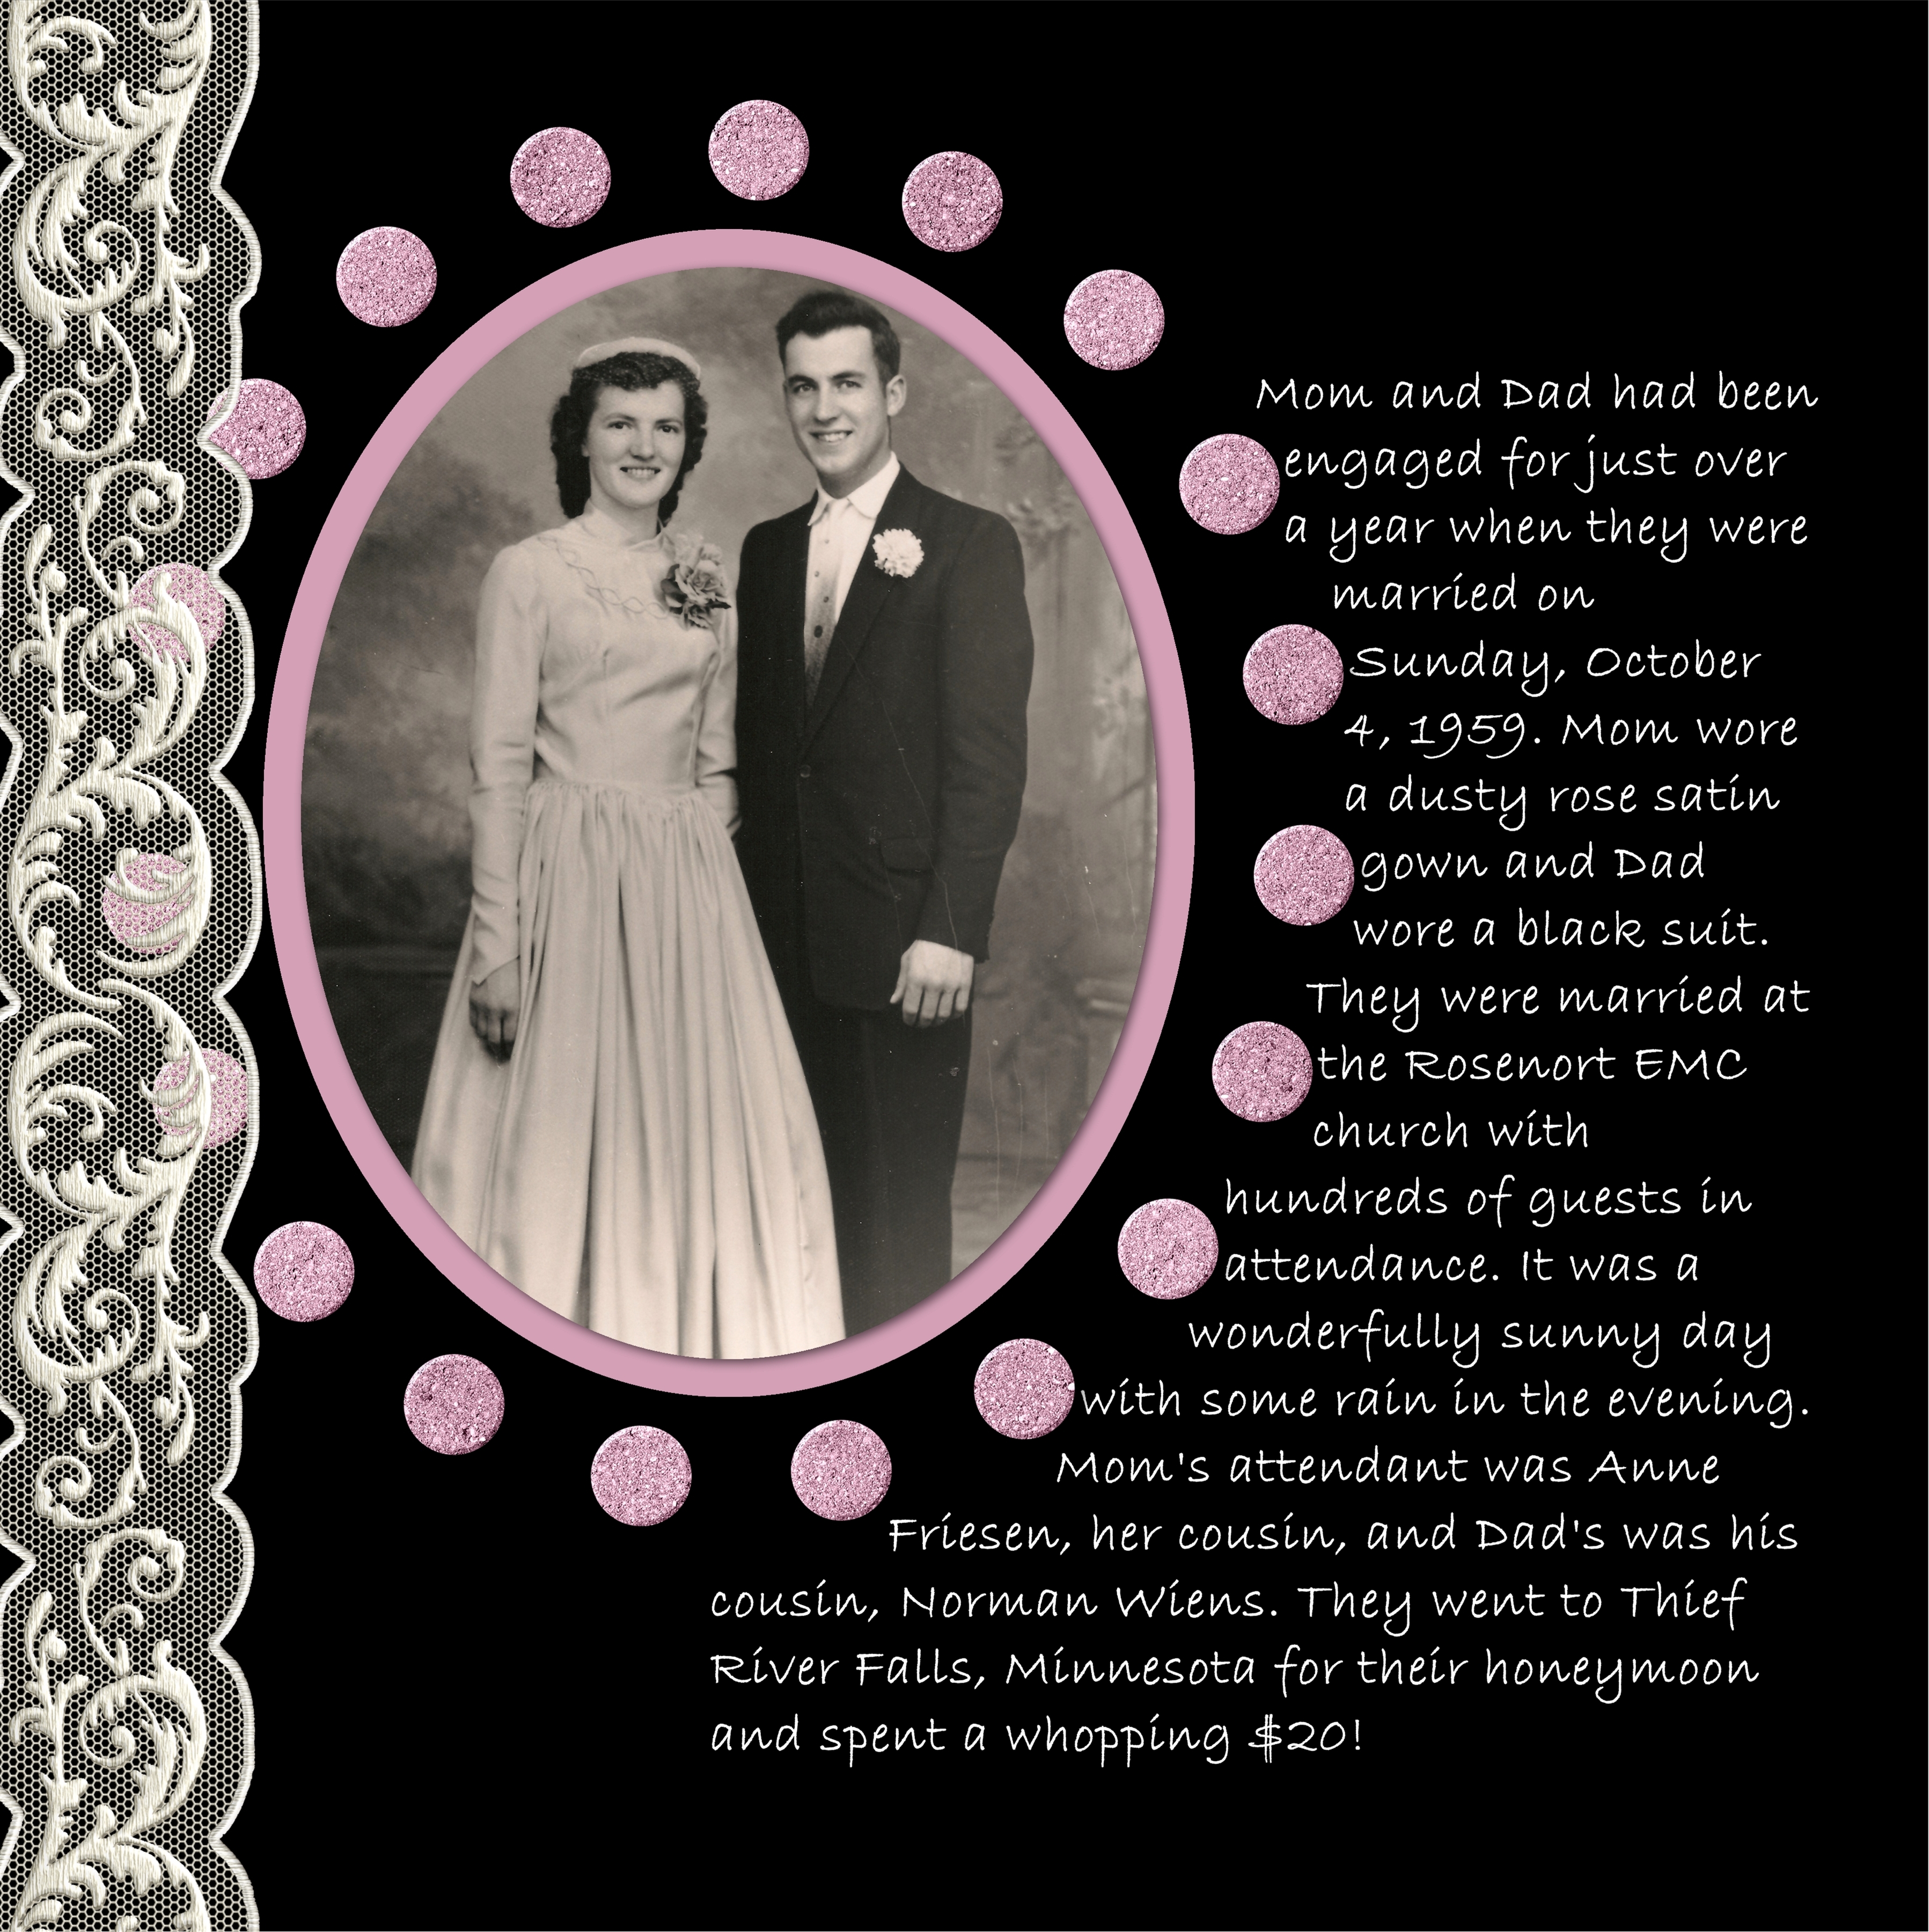
I’ve added rounded corners, a 3-D edge and a light shadow to look more like chipboard but that’s all optional. (It was somewhat distressing to discover that rounding the corners isn’t as easy as choosing the same amount for each element – the amount of rounding is relative to the overall size of the element.)

Fullscreen capture 5142016 53958 PM.bmp

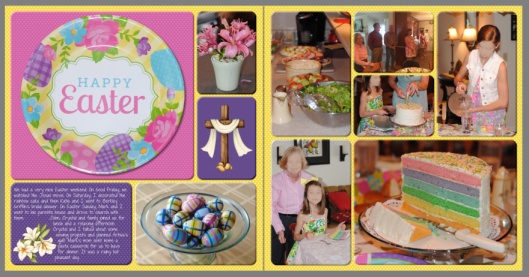
Yes, I took a picture of the plate but I knew that was an easy title!

Please let me know if you try this method and how it works for you. Of course, I will want to know if something is unclear or incorrect.

A Personalized Sleeve for a Coffee Cup

24 Tuesday Nov 2015

Posted by Enjolivure in Misc., Scrapbooking

≈ 1 Comment

Tags

coffee, gift, shapes

coffee cup cover photoI got the idea from Pinterest (of course) to give a Starbucks gift card in a Starbucks cup so that’s exactly what I’m going to give my hairstylist for Christmas. Making a sleeve using Artisan and printing it on brown cardstock adds the finishing touch. I lined the cup with wrinkled brown paper to look like coffee and added cotton balls to look like whipped cream. If you mention to the Starbucks employee, when purchasing a gift card, that you would like a cup and straw for packaging, they are not likely to say no!

coffee cup sleeveDownload this template and make the finished size 10.75″ x 3″ (Right Click, Properties). Add your decoration in the middle, group the elements together (Arrange tab), and, if necessary, Rotate 90 Degrees Clockwise (Arrange tab) so it will fit on standard printer paper. To center it on the page: Home, Align, Center on Page. Then Save, Print (File tab), Print, Current Page, Print. The Christmas tree is from the Digital Variety Kit (I reduced the opacity) and the font for Jenny is Xiomara.

If you want to save it as a shape so you can add a border and/or easily find it to use again, you will have to go through a few more steps. Make the sleeve 10.75″ x 3″. Flatten (Arrange tab). Using the Wand (Cut tab), cut away the background. Click on Outliner (Insert tab), Right Click, Shape, Save As… Give it a name and Save.

When Outlined Text Shapes Overlap

15 Sunday Nov 2015

Posted by Enjolivure in Scrapbooking

≈ Leave a comment

Tags

overlap, text shape

text shape overlapSometimes, when typing a word using the Text Shape feature (which includes the option of creating a border around each letter), the borders overlap and it doesn’t look quite right. An easy solution is to type the word, a space and type the individual letter(s) that are overlapping.awkard letters one

Zoom in to about 200%, insert a vertical line on one side of the original offending letter and a horizontal line on the top or bottom of the letter. Cut the extra letters away from the original word (Cut, Straight, Straight Edge, OK to flatten, move line between word and extra letter, Keep Both Areas, Cut) and then move the individual letter on top of the word using the alignment markings. awkward letters fixFlatten it all together and it will look all cleaned up!

Note: font is Leokadia Deco

Front & Center

15 Sunday Nov 2015

Posted by Enjolivure in Scrapbooking

≈ Leave a comment

Tags

alignment, center

front and centerWhen working on pages for a book, the binding throws the center off from the left page to the right page. To ensure that your elements are properly centered on each page, create a brightly colored bar that is 11.436″ by .5″ (for a 12 x 12 page) and place it at the top of the page, out of the way. Line it up with the edges of the page excluding the binding.center barNow, for the fussy detailed scrapbookers like me, all the elements can be centered with the bar. If the page is already created and all the elements need to be moved, group them all together (except for the temporary bar and the background) and then line up the grouped elements with the bar using the alignment tool (Arrange tab).

Safeguard Your Scrapbooks!

02 Friday Oct 2015

Posted by Enjolivure in Scrapbooking

≈ Leave a comment

safeguard title

Creative Memories/Panstoria/Forever… whatever it’s called now… keeps sending updates. Updates are good because the features improve but the problem is, if you don’t keep up with the updates, eventually you will not be able to print your albums. In case you ever need to reprint an album, the easiest way to recreate it would be to fill the pages with full page photos (jpg files). That’s why creating JPG files is better than saving the pages in whichever software you were using when the album was created.Windows Explorer icon

  1. Select the Windows Explorer icon (drawing of 3 file folders) on your desktop. Plug in your back-up drive and on it, create a folder called “Digital Albums as Photos”. Let’s say you just made an album called “2014 Anniversary Trip to Cancun.” In the “Digital Albums as Photos” folder, make a sub-folder entitled “2014 Trip to Cancun” (right click, New, Folder). Minimize the window.
  2. Open the software used to create this album and then open the project file.
  3. Save the pages to the new folder you just created as follows: File, Save As, Export Multiple Pages, Browse: select the newly created folder, OK, Start names with: use default, Save As: JPG File, Page Range: All (default), Export, Trim Option: Full Page (default), Resolution: Best (default), Image Quality: High (default), OK.  Fullscreen capture 9302015 100622 AM.bmpFullscreen capture 9302015 100831 AM.bmpFullscreen capture 9302015 100843 AM.bmp
  4. Click on the cover and save it as well. File, Save As, Export current page, Export Page To: file name (should come up by default), Browse: select folder (if necessary), Save As: JPG, File Name: Cover, Save, Trim Option: Full Page (default), Resolution: Best (default), Image Quality: High (default), OK.
  5. Go back to Windows Explorer, open the file “2014 Trip…” select Change your View/More Options in the upper right corner and then select Extra Large Icons.arrow one arrow two Review each page and see if it looks okay. (It’s much faster to click through these image files than go through the pages on the scrapbooking software.) If there is anything you want to change, jot down the page number, go back to the album, make the changes and then save that page as follows: File, Save As, Export current page, Browse: select folder, Save As Type: JPG, double click on the existing page, Replace: Yes, Trim Option: Full page (default), Resolution: Best (default), Image Quality: High (default), OK.

Google offers unlimited photo storage. My next big project is to upload all of these photos of album pages that I’m saving.

To save photos on Google Photo:

From Gmail, click Google Apps (9 little squares in the upper right corner) and select Photos. photos appIf you are setting up an account, click on the Main Menu (3 little horizontal lines in the upper left corner) and then select Settings and choose High Quality (free unlimited storage).main menu
high quality
To start uploading, select Upload Photos.upload Browse to the folder where the jpg files are, select them (Control A to select all) and then click Open.

When the files are uploaded, the following message will appear.finished upload

Select Create Album, type the name of the album, Enter, select left arrow to return to the main menu.

To download the pictures to recreate an album: At the main menu select the album, click on More Options, Download All. more optionsdownload allThe album will be in your Downloads folder which can be viewed in Windows Explorer. Double click on the folder for the album. Select a location for the download (little blue box for more options), then OK.save options

If you are recreating an album then simply fill each page with a completed page photo.

Bonus Tip: Take a screen shot of your pages in the album and save this photo with the album page photos. It will make it a lot easier to put the pages in order, should the need arise.

Capture

Convert a Photo from PNG to JPEG using Paint

07 Sunday Jun 2015

Posted by Enjolivure in Misc., Scrapbooking

≈ Leave a comment

Tags

convert, Paint

title redo

1. Open Windows Explorer Windows Explorer icon

2. Locate the PNG photo and right-click on it.

3. Open with… Paint.

4. Save as… JPEG. Save.
Paint save as

Text Wrapping Trick

07 Friday Nov 2014

Posted by Enjolivure in Scrapbooking

≈ Leave a comment

Tags

text wrapping

text wrap threeSometimes Text Wrapping just doesn’t seem to do exactly what I want it to. Basically, the text box has to be below the element around which it is wrapped on the Elements list on the left side of the screen. Select both the text box and the element, then select the Format tab, Text Wrapping, Element Shape (or Bounding Box if you prefer but that’s too boxy and defeats the whole purpose, in my opinion), the amount of space between the two elements, OK.

However, sometimes the element does not have nice smooth edges (my dot frame) and this will make the text edge choppy. text wrap oneTo trick the system, make a shape with smooth edges. Select the new shape and the text and set up the text wrapping. text wrap two

When you’re positive that it’s written exactly the way you want it, flatten the text box (you will not be able to make any changes after flattening so you may want to make a copy and set it off to the side first) and then delete the temporary shape.

text wrap four

Miscellaneous Digital Scrapbooking Tips

08 Tuesday Jul 2014

Posted by Enjolivure in Scrapbooking

≈ Leave a comment

Tags

misc, tips

misc1. Need a title idea? Type “Scrapbook Title Ideas” in Pinterest and you’ll find more than you could ever use! There are plenty of lists sorting ideas by theme.

2. Facebook Groups to join if you want tons of ideas: Panstoria, Your Stories Go Digital, Pixels2Pages, Scrap Girls digital scrapbooking.

3. Keep a power strip in your computer bag. You’ll still be able to plug in and scrapbook even if you find yourself in a place with not enough outlets.

4. Two more items for your computer bag: an extra battery if you use a wireless mouse and a spare pair of reading glasses if you use them (I get mine at the dollar store).

Make a Custom Frame

24 Monday Mar 2014

Posted by Enjolivure in Scrapbooking

≈ Leave a comment

Tags

frame

custom frameCreate a blue rectangle that is 5″ x 7″, and a pink one that is 4″ x 6″. Align them horizontally and vertically and then flatten. frame 1.bmpUsing the wand, delete the pink rectangle. This is now the template.frame 2.bmp

Insert a pink rectangle that is 1/2″ x 7″. Align it with the left side of the template.

Insert a yellow right triangle and make it 1/2″ square. Duplicate it and align both as shown. Flatten the triangles to the pink strip.frame 3.bmp Using the wand, cut the triangles away. frame 4.bmpChange the color and surface texture of the pink strip to suit your layout. This example is glittery gold. The color is from the skin color options and then using the HSB (Hue/Saturation/Brightness) option, I made it a bit more goldish. I changed the surface to Block and made the contrast 10 to make it look glittery.frame 5.bmpMake a copy of the left side frame piece and align it with the original piece. Edit the top piece, using the image filter, to soften the edge to 25. Select the bottom piece and change the color to the darkest color that is in this image. You can use the HSB option to make it a little bit darker so it will contrast with the top piece. Now the piece has a little bit of a dark frame around the edges. Flatten the two gold pieces together. (This method of framing an element is explained here.)

Copy the left side piece and flip the second piece horizontally and align it with the right side of the blue template. Duplicate it again, rotate it 90° and align it with the top, left corner of the blue frame.frame 6.bmpSelect the top piece, click Cut & Fill, straight, blended edge, and make a fairly wide blended cut in the middle of this top, horizontal piece. Select Keep Both Pieces before selecting Cut. Align the left piece on the left side of the blue frame and the right piece on the right side of the blue frame. Flatten the two pieces together to form the horizontal 5” part of the frame. Duplicate this new piece, flip it and align it at the bottom of the blue template.

Select the blue frame template and make it the same color as the edge of the frame (should be the most recent color used). Flatten all five pieces together. Using the image filter, add a 3-D edge. The one shown here is: amount – 80, softness – 0, width – 35.

Click on format, shadow, and select the center option of heavy shadows. Flatten. Add shadowing to match the other elements on the page. Insert a 4.5″ x 6.5″ photo behind your custom frame.frame 7.bmpOf course, you can make your frame the size you want. A square frame would be a bit easier to make. Please let me know if you try this and then show me the final outcome!

Mat & Modify

28 Saturday Dec 2013

Posted by Enjolivure in Scrapbooking

≈ Leave a comment

Tags

align, grid, mat, snap

mat and modifyCramming a year’s worth of photos into 100 pages (although I have to admit that the number of pages is going down as my children get older) requires layouts that often have quite a few photos. In fact, if I’m scraplifting (using someone else’s layout idea), I’ll often replace the size and location of one of their photos with four or more of mine but there’s a bit of a challenge in making it all look just right.photo mat 1

Each photo needs to have dimensions that are divisible by 1/8″ (right click the photo, Properties, and adjust the measurements to end with .000 or .125 or .250 or .375 or .500 or .625 or .750 or .875) so you can use the Grid Snap option (View, Guides, Grid, Select Show Lines, Select Snap to Grid, Select a color that will show up well, Select 1/8″ for Grid Spacing, OK). Zoom in and move the photos to be right up against each other. If you like photos and elements to line up nicely on your pages anyway, then you will use this tool a lot!

Th problem with placing photos right next to each other and then matting them (Format Photo, Select Mat, choose from the various options), so you can see the individual photos, is that the outside border is half the size of the inside borders. This is just wrong!Photo mat 2Here’s an easy fix: First, make the mats different colors (Format Photo, Select Mat, Mat Fill).photo mat 3

Second, zoom in and, using the arrow keys, move the photos so that the interior frames completely overlap each other.

In this example, move the green mat to line up exactly under the blue mat and then use the Align tool to make the purple mat line up with the green one. Use the arrows to move the red mat up under the blue mat and then use the Align tool again to move the purple mat up.photo mat 4

Third, change the mats so they all have the same color. That looks sooo much better!photo mat 5

← Older posts

Recent Posts

  • 12-Block Scrapbooking
  • A Personalized Sleeve for a Coffee Cup
  • When Outlined Text Shapes Overlap
  • Front & Center
  • Safeguard Your Scrapbooks!

Archives

  • May 2016
  • November 2015
  • October 2015
  • June 2015
  • March 2015
  • November 2014
  • July 2014
  • March 2014
  • December 2013
  • November 2013
  • October 2013
  • August 2013
  • July 2013
  • May 2013
  • April 2013
  • March 2013
  • January 2013
  • December 2012
  • October 2012
  • September 2012
  • August 2012
  • July 2012
  • June 2012

Categories

  • Family
  • Misc.
  • Scrapbooking

Enter your email address to follow this blog and receive notifications of new posts by email.

Join 24 other subscribers

Follow my Blog!

  • RSS - Posts
  • RSS - Comments

Blogs I Follow

  • Inside Stitch: The Official Vera Bradley Blog
  • Ordinary Days
  • WordPress.com News

Blog at WordPress.com.

Inside Stitch: The Official Vera Bradley Blog

Ordinary Days

Finding beauty, joy, and simplicity in the everyday moments

WordPress.com News

The latest news on WordPress.com and the WordPress community.

Privacy & Cookies: This site uses cookies. By continuing to use this website, you agree to their use.
To find out more, including how to control cookies, see here: Cookie Policy
  • Follow Following
    • enjolivure
    • Already have a WordPress.com account? Log in now.
    • enjolivure
    • Customize
    • Follow Following
    • Sign up
    • Log in
    • Report this content
    • View site in Reader
    • Manage subscriptions
    • Collapse this bar
 

Loading Comments...