• About

enjolivure

~ embellishments for digital scrapbooking and more

enjolivure

Category Archives: Misc.

A Personalized Sleeve for a Coffee Cup

24 Tuesday Nov 2015

Posted by Enjolivure in Misc., Scrapbooking

≈ 1 Comment

Tags

coffee, gift, shapes

coffee cup cover photoI got the idea from Pinterest (of course) to give a Starbucks gift card in a Starbucks cup so that’s exactly what I’m going to give my hairstylist for Christmas. Making a sleeve using Artisan and printing it on brown cardstock adds the finishing touch. I lined the cup with wrinkled brown paper to look like coffee and added cotton balls to look like whipped cream. If you mention to the Starbucks employee, when purchasing a gift card, that you would like a cup and straw for packaging, they are not likely to say no!

coffee cup sleeveDownload this template and make the finished size 10.75″ x 3″ (Right Click, Properties). Add your decoration in the middle, group the elements together (Arrange tab), and, if necessary, Rotate 90 Degrees Clockwise (Arrange tab) so it will fit on standard printer paper. To center it on the page: Home, Align, Center on Page. Then Save, Print (File tab), Print, Current Page, Print. The Christmas tree is from the Digital Variety Kit (I reduced the opacity) and the font for Jenny is Xiomara.

If you want to save it as a shape so you can add a border and/or easily find it to use again, you will have to go through a few more steps. Make the sleeve 10.75″ x 3″. Flatten (Arrange tab). Using the Wand (Cut tab), cut away the background. Click on Outliner (Insert tab), Right Click, Shape, Save As… Give it a name and Save.

Convert a Photo from PNG to JPEG using Paint

07 Sunday Jun 2015

Posted by Enjolivure in Misc., Scrapbooking

≈ Leave a comment

Tags

convert, Paint

title redo

1. Open Windows Explorer Windows Explorer icon

2. Locate the PNG photo and right-click on it.

3. Open with… Paint.

4. Save as… JPEG. Save.
Paint save as

Sewing Civil Air Patrol Cadet Officer Patches… the easy way!

12 Thursday Mar 2015

Posted by Enjolivure in Misc.

≈ 28 Comments

Tags

Civil Air Patrol, sewing

Cadet Officer PatchesWhen my son first joined the Civil Air Patrol over seven years ago, I didn’t mind sewing the name tapes and other patches onto his BDU’s. However, that all changed when he earned the Billy Mitchell Award and came home with blue fabric scraps with unfinished edges and a white dot in the middle that I was supposed to form into a square and sew onto his cap and collars. I somehow managed to fold it into the correct shape and pin it in place and get it sewn on but after promoting all the way to Cadet Colonel and having two sets of BDU’s, those officer patches were still a source of frustration for me even as an experienced seamstress and home-ec graduate! I pinned and basted and ironed and even made little templates but every time he promoted, I knew the frustration would return.

It’s been three years since his last promotion but I’m still being asked occasionally to sew on a cadet’s newly earned patches and I gladly donate my time to this organization which has played a huge and positive role in my son’s life. Just the other day, after procrastinating on a BDU sewing job, a brilliant idea popped into my head. What if I were to use fabric adhesive spray to help form the patches and then also use it to keep them in place while sewing? It worked wonderfully! In fact, I sewed three patches in just a few minutes!

Here’s how to do it: Set out a large protective surface (I used poster board). Spray the back side of the patch and fold the top and bottom to the back. Press firmly and hold in place for a few seconds. There is supposed to be a 1/8” blue frame all around the dots (or diamonds) so measuring and ironing it first would help with accuracy.

IMG_0744

Spray the back again and fold the sides in pressing firmly for a few seconds with your fingers.IMG_0746

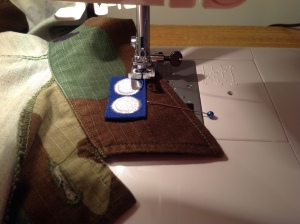
Carefully following the regulations, spray the back again of the now-folded patch and press it down in the proper place on the uniform.IMG_0747

Stitch around the edge and you are done! If the side has flared a bit and there is some fabric sticking out from under the patch, use a pin to tuck it back in while you are sewing. IMG_0748

The can of adhesive spray was $12.95 and worth every penny. I sure wish I had thought to buy a can the day my son became a Civil Air Patrol cadet officer!IMG_0750

Keep Scrapbooking! Dinner’s Cooking!

08 Tuesday Jul 2014

Posted by Enjolivure in Family, Misc.

≈ 2 Comments

Tags

crockpot

Discovering Freezer-to-Crockpot cooking was a huge relief for me! I want to provide healthy, tasty dinners for my family but I also like to keep it simple, not stress every day about dinner and have time to pursue my favorite hobby of scrapbooking. My neighbor recently hosted a meal preparation party and while it was a lot of fun to spend time with others, prepare six meals and laugh a lot, I decided that I wanted to fill my freezer and needed to get this massive project done at home.

My daughter and I prepared 28 meals in about 1 1/2 days. Together with occasionally eating out, leftovers, Sunday Snack Supper and alternate dinner plans, this should get us through the summer. I hope to send my children off to college next month with good memories of good meals!

crockpot blog post

Method:

1. Decide which recipes to make and prepare a shopping list. I double each recipe and even triple a few of our favorites. Be sure to include freezer-quality gallon and quart-sized bags on your list as well as slow cooker liners. Two-gallon bags will also come in handy.IMG_0154

2. Label gallon bags for each recipe. Some recipes will also require a quart-size bag or small snack bag to separate some ingredients.

3. Collect the ingredients and place the required amounts into the bags. Placing the bags (with the tops folded down just a bit to keep the zip part clean) in a bowl will keep them standing up. This is especially important when adding liquid.

4. Remove as much air as possible, then lay the bag flat and distribute the ingredients evenly in the bag.

5. Place in the freezer laying flat. The next day, stand the bags up in tubs so you can easily flip through your meals to make your selection!IMG_0156

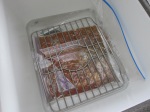
6. Either select your meal the night before and thaw it in the refrigerator overnight or place it in cold water for several hours the morning of cooking. I keep a two-gallon bag handy for thawing. I place the meal in the large bag and in the sink with cold water but keep the top up and to the side so that water cannot seep in. (Yes, that’s my drying rack keeping the bag in the water seeing as there is some air which makes it all want to float up.)IMG_0151
Handy Tips:

1. Williams Sonoma makes a terrific chopper which creates neat little squares of green peppers, onions and even garlic cloves. I’ve had mine for at least ten years and can’t imagine this much food preparation without it.

2. Hefty makes two-gallon sized bags. These are perfect for meals that have several separate components that won’t all fit into a one-gallon bag. These two-gallon sized bags are also the right size for toting a 12 x 12 book (note the scrapbooking reference!).IMG_0157

3. A crockpot liner will make cooking clean-up easy, peasy.

4. Do the grocery shopping on one day and food preparation the next. When my daughter and I went shopping, we gathered all the pantry items and she checked out and loaded them in the car while I started on the produce and cold ingredients. We placed the refrigerator and freezer groceries in coolers and added ice when we got home so they could stay there overnight.

5.  Wear comfortable shoes and be well-rested to take on this task!

6. For breakfasts, lunches and snacks, prepare a plan to re-use each week. Keep it simple!

7. I use the meal planning app, Meal Board. Here I can import recipes, create menus and print out (or email) the grocery lists and menu plans. I really appreciate the feature of being able to enter recipes on my laptop even though I typically use the app on my iPad.

8. If a recipe calls for shredded chicken, I take the chicken breasts out of the crockpot about a half to one hour before serving and shred them with my Kitchen Aid mixer. It takes less than a minute. I return the chicken to the crockpot until dinner time and immediately wash the bowl and beater.

shredded chicken

9. Don’t lift the lid unless you don’t mind losing 20 minutes of cooking time. A slow cooker should be about one-half to three-fourths full for best results.

These are the recipes we prepared. The Chicken Fajitas are Katie’s favorite. We’ve also had the Balsamic Chicken and the Tender Beef Stew which were also delicious. So far, so good! Many of the recipes suggest serving rice or pasta with the meal but since we shy away from carbs, I typically offer a side salad. I expect that you will discover many other recipes on these blogs. Let me know what you try and whether or not you enjoyed it!

Balsamic Chicken with Olives

Cajun Roast

Cheeseburger Meatloaf

Chipotle Beef Tacos

Beef Tacos

Chicken Fajitas

Lemon Chicken

Mexican Chicken Taco Stuffing

Pesto Chicken

Sloppy Joes

Southwest Chicken Soup

Teriyaki Honey Chicken

Tender Beef Stew (Trim Healthy Mama book, Pg 309)

Customize Your Facebook Cover Photo

07 Monday Oct 2013

Posted by Enjolivure in Misc., Scrapbooking

≈ Leave a comment

Tags

Facebook, Snipping Tool

Changing the Cover on Facebook (“FB”) can be a bit of a challenge because the banner is so wide and photos normally don’t fit well. Whether you want to change the cover on your personal page or on a group page, it can be easily done thanks to Panstoria’s Artisan, the recent replacement for Creative Memories’ Storybook.

1. Using the Snipping Tool, cut the exact shape of the cover photo on FB and paste it onto a blank page in Artisan. Now you have a template to work with. In case you don’t want to use the Snipping Tool, you can cheat by entering these dimensions in the properties section: personal or page cover photo is 8.5 x 3.125, a group cover photo is 8 x 2.5. Keep in mind the little box in the lower left which is going to block out part of your photo!Fullscreen capture 10072013 103824 AM.bmp

2.  If the photo or artwork you want to use doesn’t fit well, you can always center the photo and then add solid colors or some design on the sides. I recently had some event artwork I wanted to use for a group page but it was too tall. I cut it down to what I thought looked good, blended the edge on each side and then made the background color to match the artwork. I recently updated it to add the registration deadline. All of the members of the group shouldn’t miss the deadline now!FB banner

3. Even if your photo would fit into the banner just fine, with Artisan you can add frames or special effects. Add your photo to the page and then, using the Align options, make it the same size as the banner. Then you can crop and add mats or frames. In fact, you can drop a paper onto the photo part if you just want some decoration.vera

4. Save your new photo or artwork as a jpeg (I have a Facebook file for these kinds of projects) and then change the cover on your FB page. Easy, peasy!

Snip, Snip!

16 Friday Aug 2013

Posted by Enjolivure in Misc., Scrapbooking

≈ 1 Comment

Tags

snip, snipping

Yes, I have already posted about the Snipping Tool twice (fonts and scraplifting) but if you are not using it, let me reintroduce you. Microsoft has a short video showing how it works. Be sure to read the FAQ so you will fully understand its benefits. While reviewing the video just now, I learned about features that I wasn’t even using. I hadn’t paid enough attention to realize that I could save a snip as a jpeg – that will come in very handy!snip toolThe Snipping Tool is on the Task Bar at the bottom of my screen because I use it so often. In my family, we email birthday and anniversary greetings and with 33 of us (and growing!) there are a lot of greetings going around! Gmail doesn’t offer enough fonts for my taste so creating a greeting in Word, and then snipping and pasting it directly into an email, is the perfect option.karenSnipping is an easy way to email Facebook posts to friends and family who are not on Facebook.

And, finally, if you are a digital scrapbooker and you want to use a technique from another post in my blog, you can snip and paste it onto the page you are working on. Obviously, this will save going back and forth.instructionsDo you like the Snipping Tool as much as I do?

Think Outside the Storybook

10 Friday May 2013

Posted by Enjolivure in Misc., Scrapbooking

≈ Leave a comment

Tags

scallops, sew, skirt

I’ve said it before; I’ll say it again: I use CM for way more than scrapbooking! Katie found a very cute skirt sold by J Crew but the skirt was too short and the price tag was rather high (especially for a seamstress). Of course, I looked at it and said, “I could make that.” It is just two squares with pockets and an elastic waist. For this skirt, I went to the extra trouble of making a scalloped hem which is very popular with Lilly Pulitzer clothes this summer. Perhaps I could have just taken some mugs or bowls and traced along a line to make the scallop pattern but it was more fun to create it using CM.

The process… print the pattern twice, cut up the middle, cut out the scallops, tape the pieces together overlapping the scallops, finish the straight hem with the serger before turning it to the right side, pin the hem (rights sides together), trace the scalloped hem with a pencil, sew along the pencil lines, trim the fabric, turn right side out and press.

Fullscreen capture 04152013 31728 PM.bmp

It was a bit of extra work but well worth it considering the final cost was only about $15.IMG_0228

CM Does it Again! Another Non-Scrapbooking Application.

18 Friday Jan 2013

Posted by Enjolivure in Misc., Scrapbooking

≈ Leave a comment

Tags

floor plan, rearrange furniture

You can use Creative Memories to help you rearrange a room! Our den has been the same for over five years and it was time to make a change. Seeing as we, like most people I’m sure, have several pieces of fairly heavy furniture in our den, I wanted to make a plan before I started the grunt work of moving things around.

Naturally, the first thing I did was measure the room. Quite surprisingly, it was within inches of being square. I measured the furniture and made scale models on CM. (I switched the measuring unit to metric and then took the number of inches of the actual furniture, doubled it and used that as my amount of millimeters.) It was so easy to create these pieces and move them around.

I actually came up with this plan some time ago but it wasn’t until two days ago, while home alone, that the change took place. We all like it but it still needs a little bit of tweeking.

den

That’s My Drink!

22 Saturday Dec 2012

Posted by Enjolivure in Misc., Scrapbooking

≈ Leave a comment

Tags

drink marker, party

Katie found some very cute Drink Markers in the dollar section at Target, but of course, I see crafty little things like this as Creative Memories projects! So, quick, before you have guests over: customize, print, cut, label.

DSC_0081

To make your own Drink Markers:

1. Send me an email (ltwibell63@gmail.com) requesting the CM file. Download the file and open it in Storybook. (For some reason, I couldn’t attach it to this post.)

2. Ungroup the Drink Markers and change the patterns and colors as desired. This is what they could look like if you use the Holidazzle Digital Kit.

Fullscreen capture 12222012 123624 PM.bmp

3. Print on cardstock.

4. Cut out the small circle in the middle first. I used CM’s 3.75” circle pattern from the Custom Cutting System with the blue blade on the inside circle of the pattern and using the larger black printed circle as a placement guide.DSC_0086

5. Cut out the outside of the drink marker. I used the 5.75” circle pattern with the blue blade on the inside circle of the pattern and using the smaller black printed circle as a placement guide. Alternately, you can simply cut out the markers by hand.DSC_0087

7. Slice the line, label and you’ll be sure that everyone will drink from their own glass!

Paint Nolish

12 Thursday Jul 2012

Posted by Enjolivure in Misc.

≈ Leave a comment

My sister-in-law’s niece came up with the adorable term “paint nolish” for those little bottles that are loved by girls of all ages.

I’m not sure why we love to paint our nails but somehow Katie and I have amassed quite a collection of colors from all over the rainbow. Perhaps it’s because, like hair styles and hair color, it’s something we can afford to change frequently.

Yesterday morning as we were scurrying to get out the door, I wanted to quickly paint my toe nails. OPI’s Rose at Dawn and Cara Mia Crimson have been my favorite colors for many years but my daughter suggested I try a new color. After paint nolishing with Come to Poppy, it immediately rose to the #1 position.

I could not write about nail polish and leave out Essie’s 3-way glaze. This is the best base and topcoat that we have ever used. I frequently quickly brush it on my naked nails on Sunday morning seeing as the drive into town is long enough for the polish to dry well and leave a nice shine. My son jokes that if I’m walking around with my fingers protectively pointing up (like a doctor who has scrubbed for surgery), and asking others to grab my purse and Bible then it certainly must be time to leave for church.


Recent Posts

  • 12-Block Scrapbooking
  • A Personalized Sleeve for a Coffee Cup
  • When Outlined Text Shapes Overlap
  • Front & Center
  • Safeguard Your Scrapbooks!

Archives

  • May 2016
  • November 2015
  • October 2015
  • June 2015
  • March 2015
  • November 2014
  • July 2014
  • March 2014
  • December 2013
  • November 2013
  • October 2013
  • August 2013
  • July 2013
  • May 2013
  • April 2013
  • March 2013
  • January 2013
  • December 2012
  • October 2012
  • September 2012
  • August 2012
  • July 2012
  • June 2012

Categories

  • Family
  • Misc.
  • Scrapbooking

Enter your email address to follow this blog and receive notifications of new posts by email.

Join 24 other subscribers

Follow my Blog!

  • RSS - Posts
  • RSS - Comments

Blogs I Follow

  • Inside Stitch: The Official Vera Bradley Blog
  • Ordinary Days
  • WordPress.com News

Blog at WordPress.com.

Inside Stitch: The Official Vera Bradley Blog

Ordinary Days

Finding beauty, joy, and simplicity in the everyday moments

WordPress.com News

The latest news on WordPress.com and the WordPress community.

Privacy & Cookies: This site uses cookies. By continuing to use this website, you agree to their use.
To find out more, including how to control cookies, see here: Cookie Policy
  • Follow Following
    • enjolivure
    • Already have a WordPress.com account? Log in now.
    • enjolivure
    • Customize
    • Follow Following
    • Sign up
    • Log in
    • Report this content
    • View site in Reader
    • Manage subscriptions
    • Collapse this bar
 

Loading Comments...