• About

enjolivure

~ embellishments for digital scrapbooking and more

enjolivure

Category Archives: Scrapbooking

Family Milestones Metal Panel

30 Saturday Nov 2013

Posted by Enjolivure in Family, Scrapbooking

≈ 1 Comment

Tags

family, metal panel, significant dates

family milestones
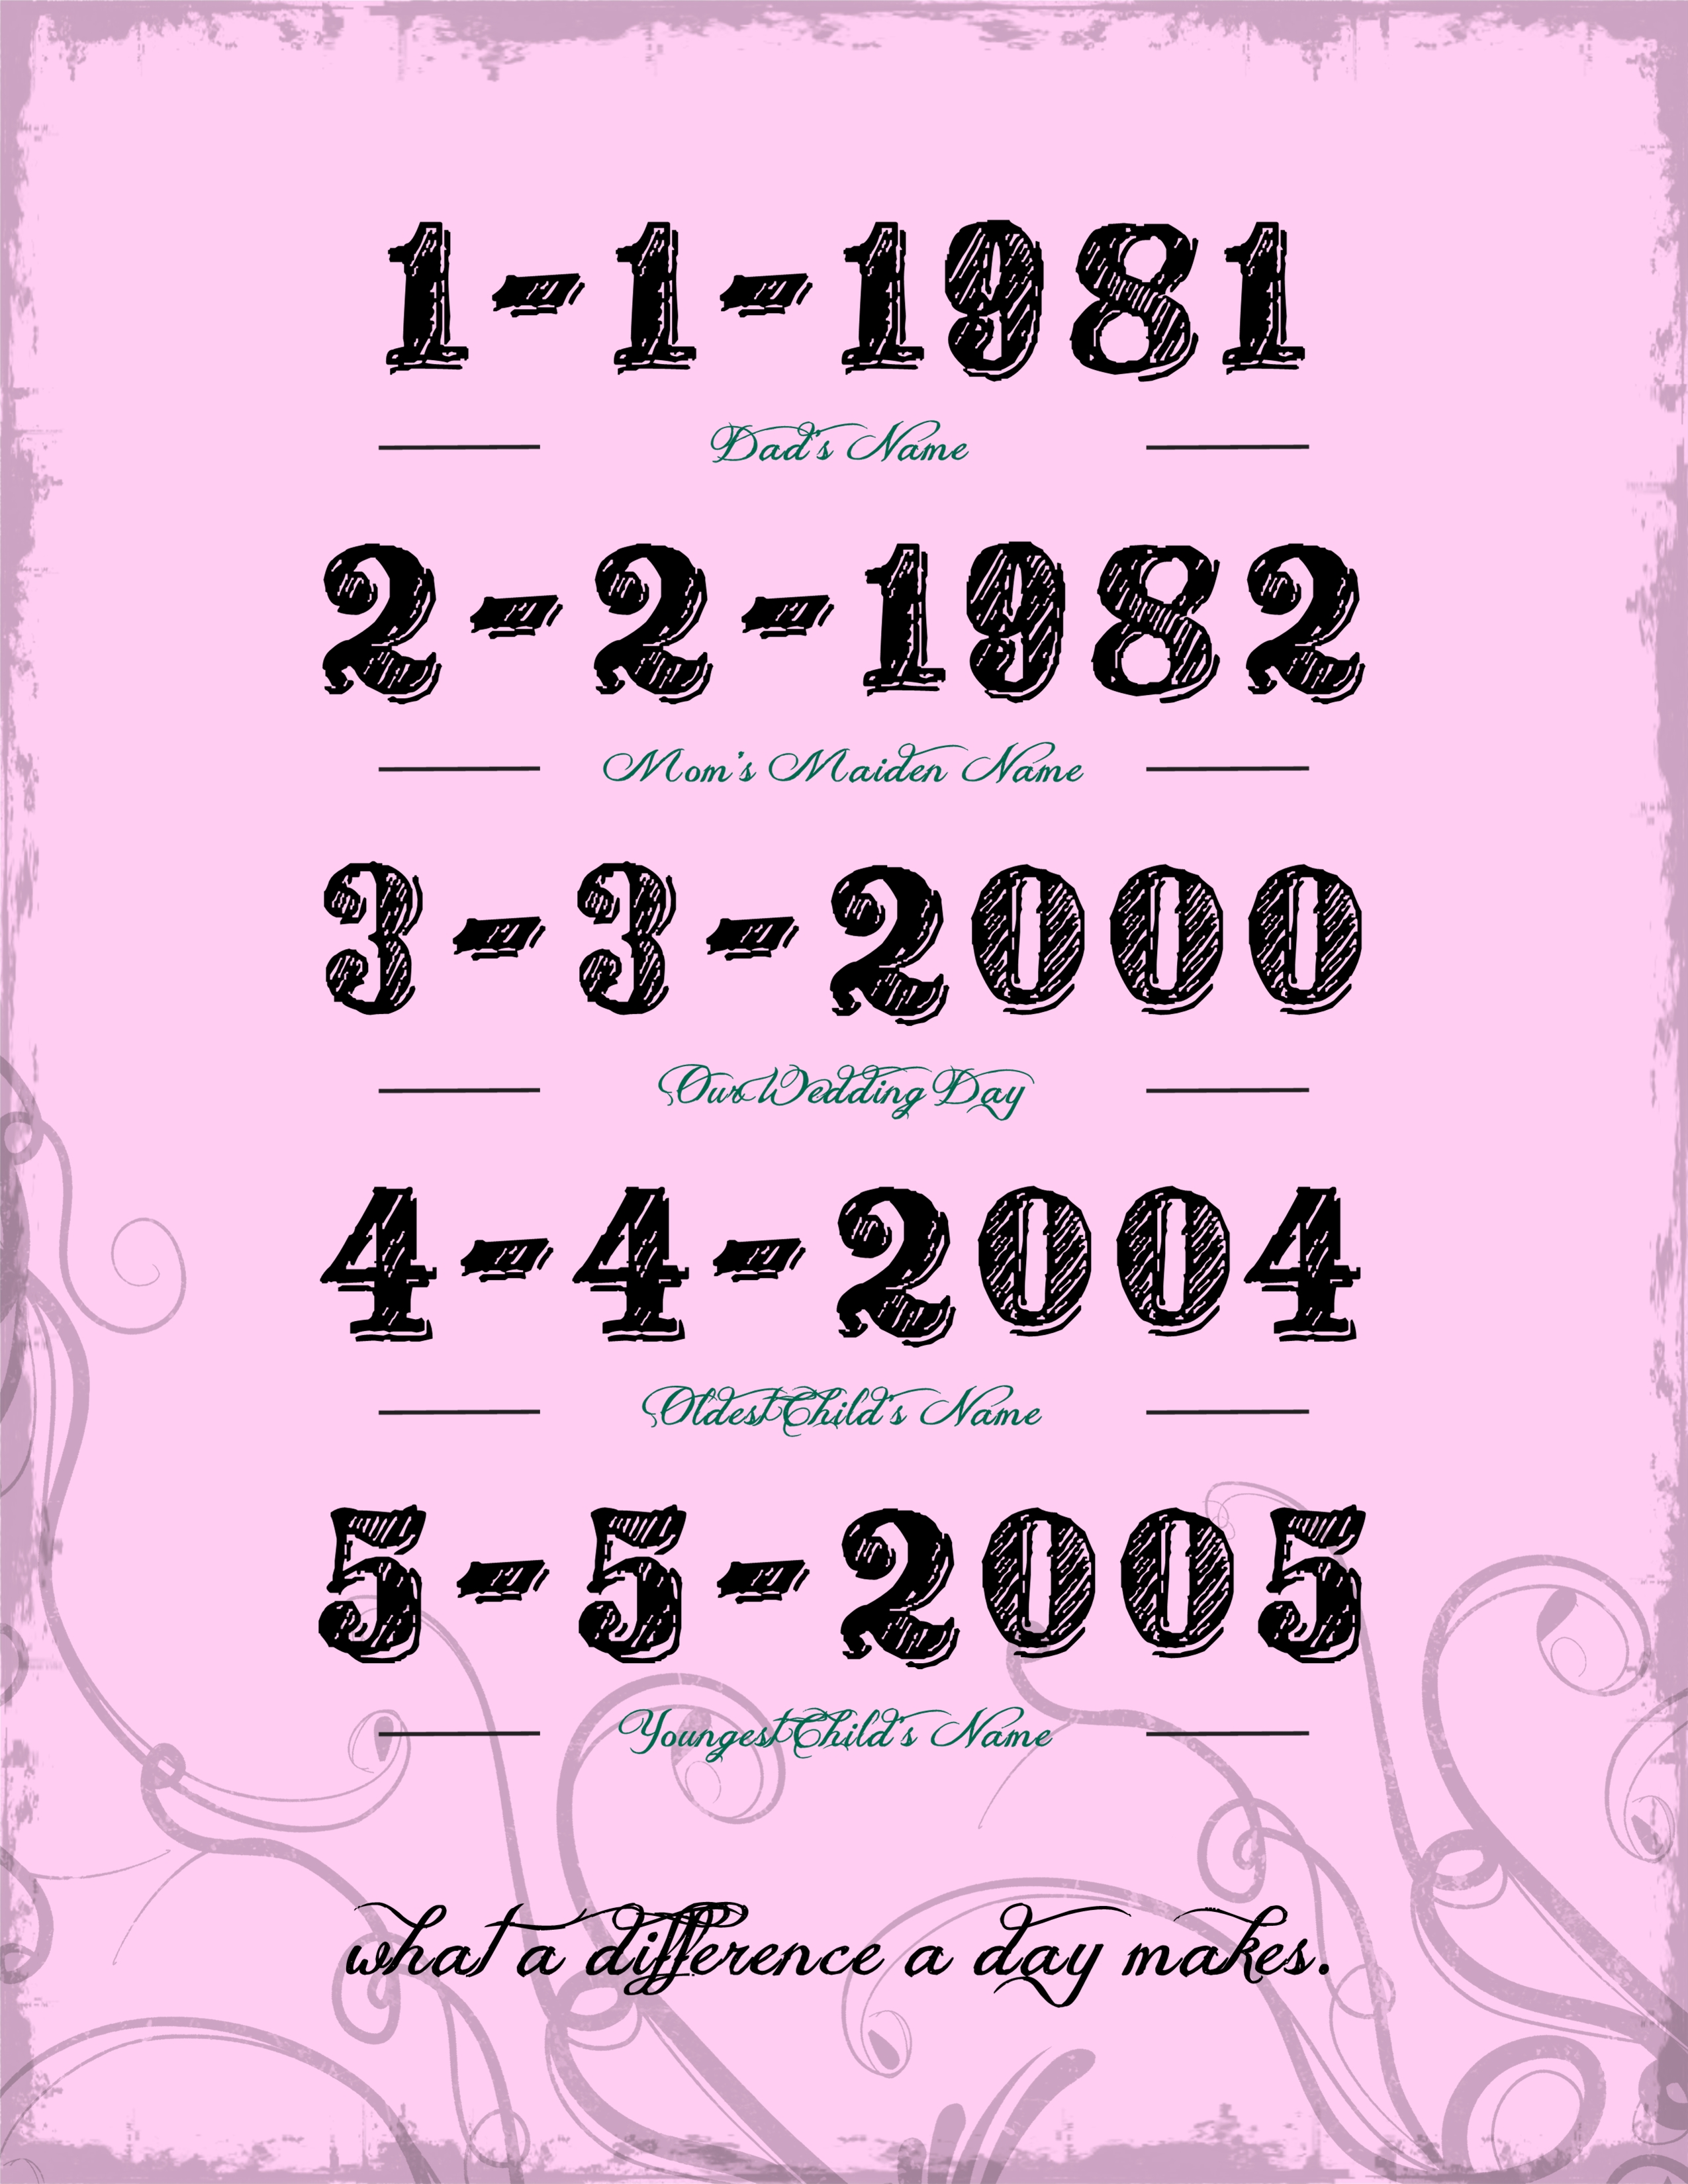
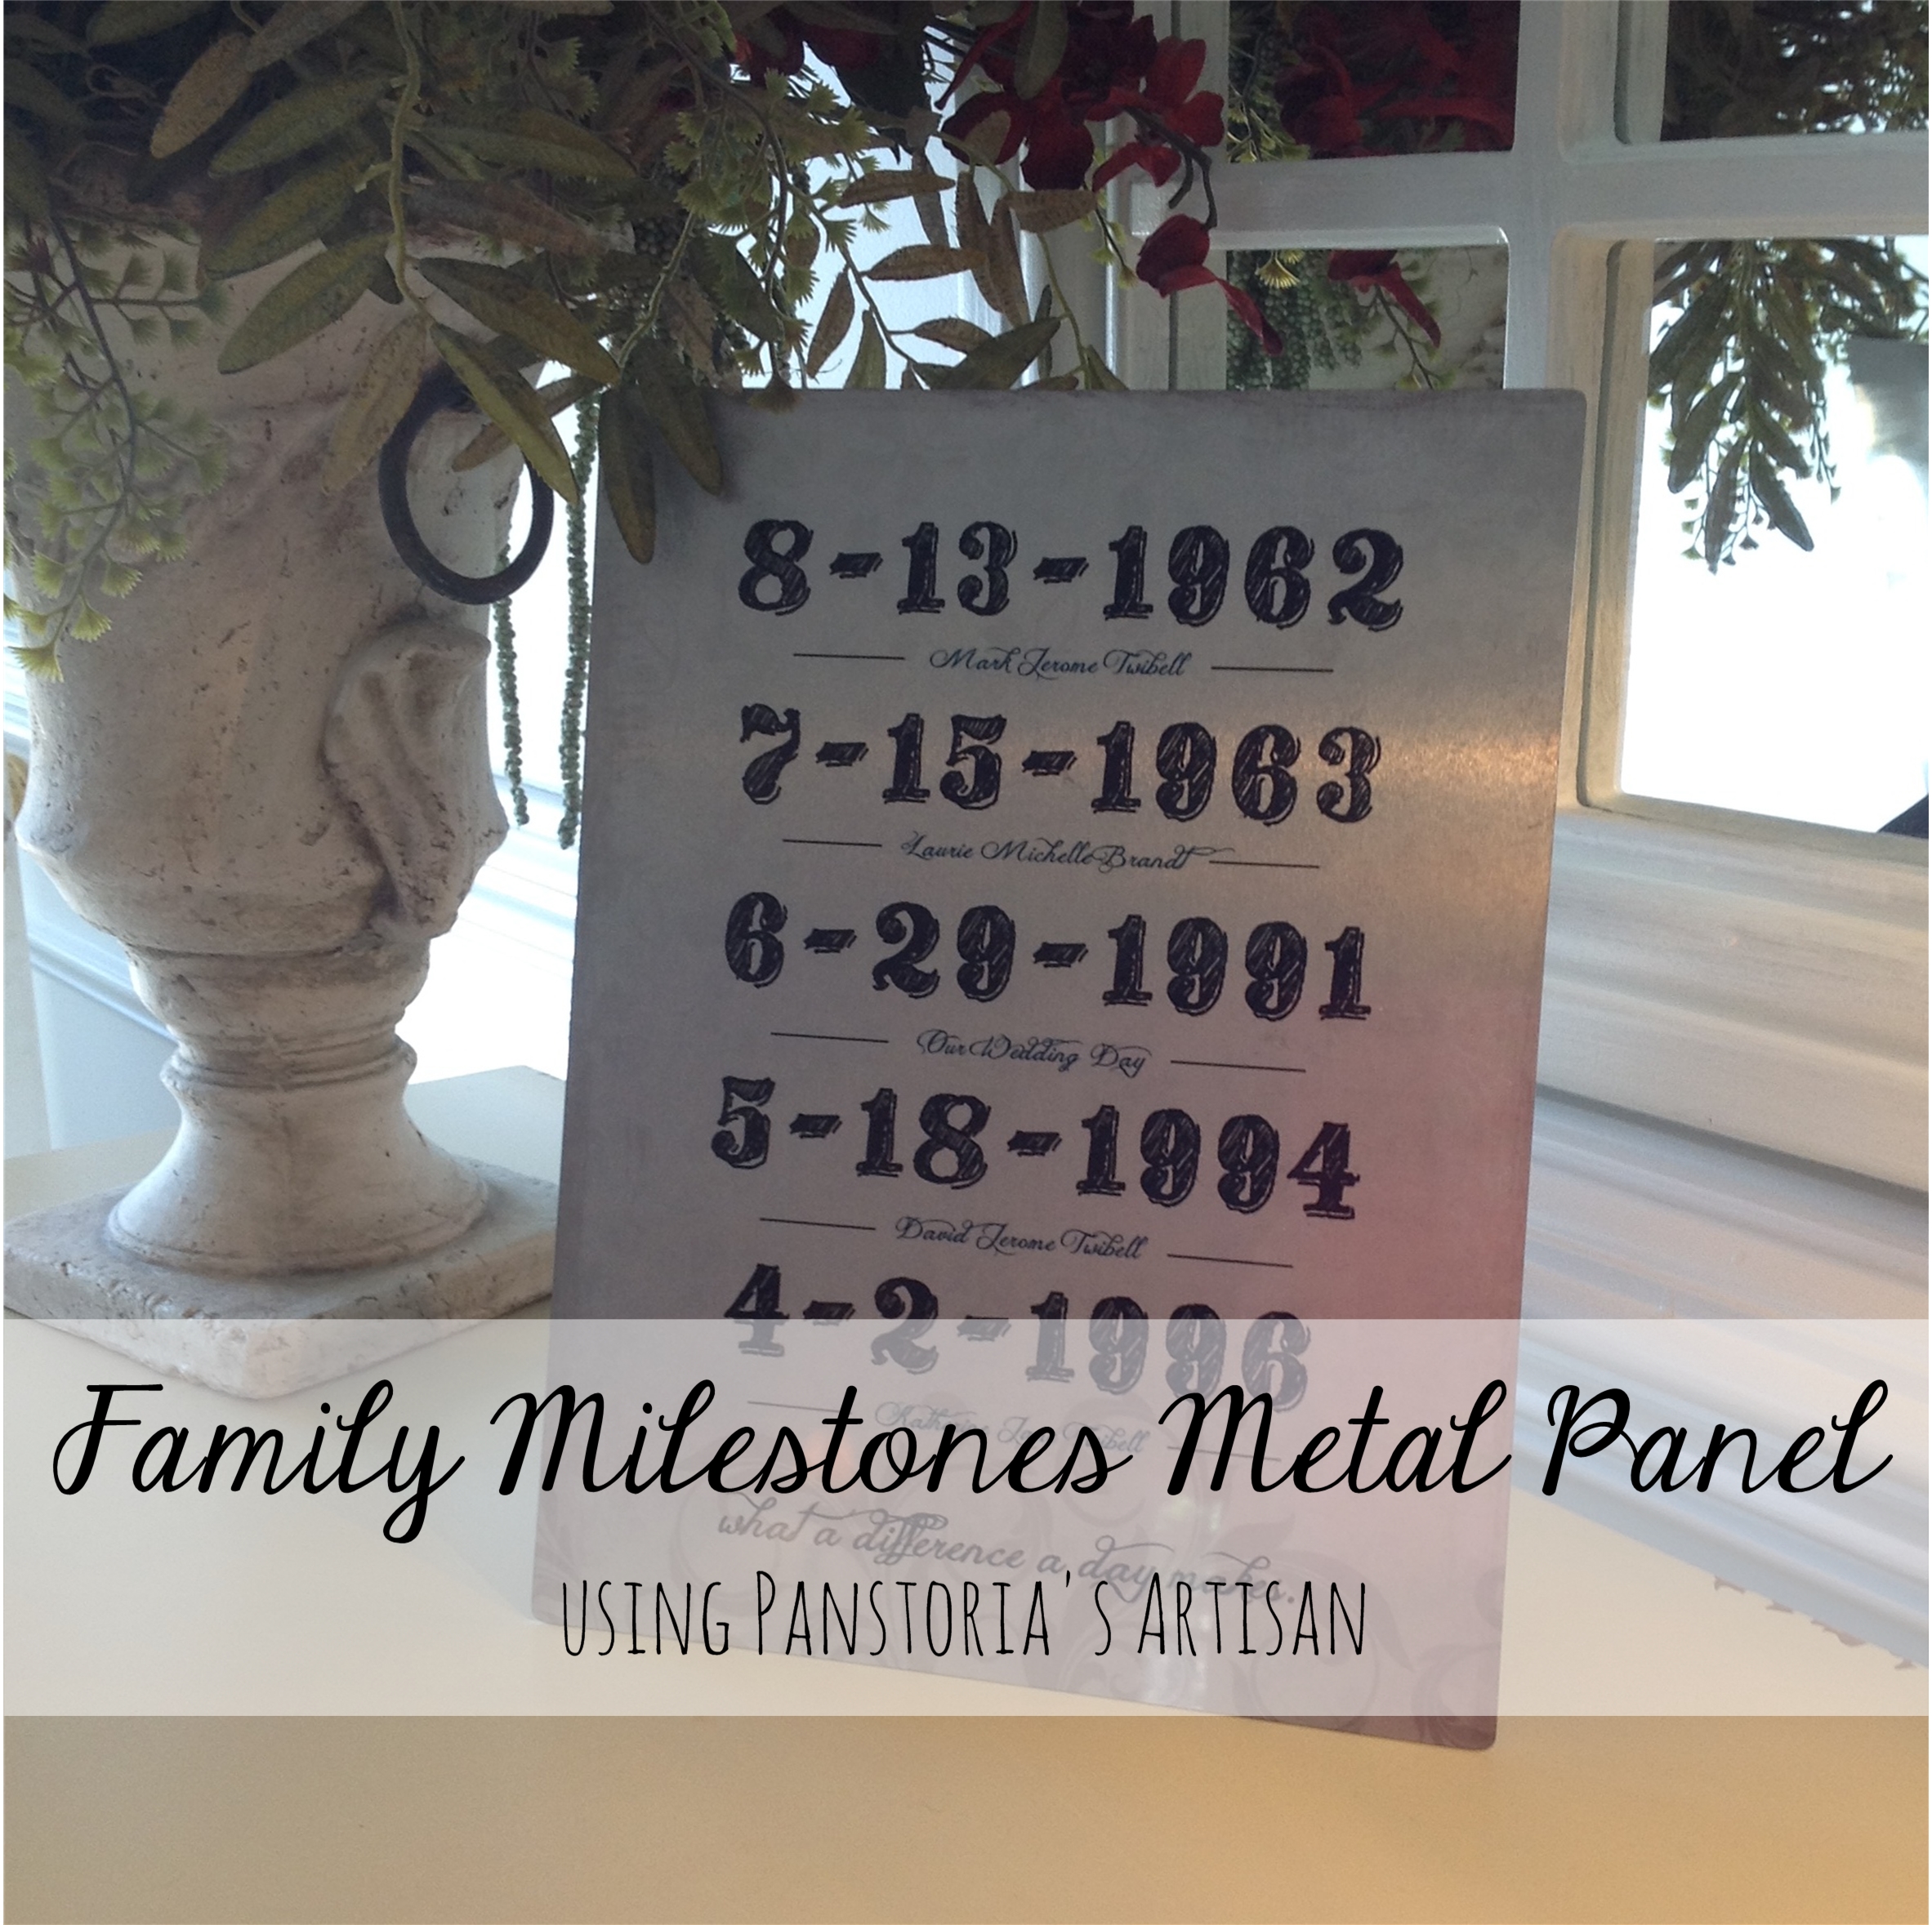
When Creative Memories, as we knew it, was still around, they had a blog post about how to make a Family Milestones Metal Panel. I made one back then and knew that as soon as my sister-in-law saw it, she would want one for her family (and I was right!). In fact, almost everyone who comes to our home and sees it on the foyer table, wants one. Thankfully, a fellow scrapbooker still had the instructions and I’ve been able to basically recreate it. Panstoria sells metal panels but CVS’s panel, although only available in 8 x 10, is less expensive and the quality is just as good as what I ordered from Creative Memories.

To make it in Artisan, first install the two fonts that are used: Jellyka Delicious Cake and Twenty12. The two templates here are for element placement only. You’ll still need to add a shabby-style frame and a swirl pattern. Select from 8.5 x 11 (pink background) and 8 x 10 (light blue background). Once you’ve arranged it all just right, group the elements together (except for the light blue or pink background), save as a jpeg, upload and order. I cannot post links to the templates here so let me know and I’ll send them by email.

Family Milestones 8 x 10Family Milestones 8.5 x 11

Customize Your Facebook Cover Photo

07 Monday Oct 2013

Posted by Enjolivure in Misc., Scrapbooking

≈ Leave a comment

Tags

Facebook, Snipping Tool

Changing the Cover on Facebook (“FB”) can be a bit of a challenge because the banner is so wide and photos normally don’t fit well. Whether you want to change the cover on your personal page or on a group page, it can be easily done thanks to Panstoria’s Artisan, the recent replacement for Creative Memories’ Storybook.

1. Using the Snipping Tool, cut the exact shape of the cover photo on FB and paste it onto a blank page in Artisan. Now you have a template to work with. In case you don’t want to use the Snipping Tool, you can cheat by entering these dimensions in the properties section: personal or page cover photo is 8.5 x 3.125, a group cover photo is 8 x 2.5. Keep in mind the little box in the lower left which is going to block out part of your photo!Fullscreen capture 10072013 103824 AM.bmp

2.  If the photo or artwork you want to use doesn’t fit well, you can always center the photo and then add solid colors or some design on the sides. I recently had some event artwork I wanted to use for a group page but it was too tall. I cut it down to what I thought looked good, blended the edge on each side and then made the background color to match the artwork. I recently updated it to add the registration deadline. All of the members of the group shouldn’t miss the deadline now!FB banner

3. Even if your photo would fit into the banner just fine, with Artisan you can add frames or special effects. Add your photo to the page and then, using the Align options, make it the same size as the banner. Then you can crop and add mats or frames. In fact, you can drop a paper onto the photo part if you just want some decoration.vera

4. Save your new photo or artwork as a jpeg (I have a Facebook file for these kinds of projects) and then change the cover on your FB page. Easy, peasy!

Snip, Snip!

16 Friday Aug 2013

Posted by Enjolivure in Misc., Scrapbooking

≈ 1 Comment

Tags

snip, snipping

Yes, I have already posted about the Snipping Tool twice (fonts and scraplifting) but if you are not using it, let me reintroduce you. Microsoft has a short video showing how it works. Be sure to read the FAQ so you will fully understand its benefits. While reviewing the video just now, I learned about features that I wasn’t even using. I hadn’t paid enough attention to realize that I could save a snip as a jpeg – that will come in very handy!snip toolThe Snipping Tool is on the Task Bar at the bottom of my screen because I use it so often. In my family, we email birthday and anniversary greetings and with 33 of us (and growing!) there are a lot of greetings going around! Gmail doesn’t offer enough fonts for my taste so creating a greeting in Word, and then snipping and pasting it directly into an email, is the perfect option.karenSnipping is an easy way to email Facebook posts to friends and family who are not on Facebook.

And, finally, if you are a digital scrapbooker and you want to use a technique from another post in my blog, you can snip and paste it onto the page you are working on. Obviously, this will save going back and forth.instructionsDo you like the Snipping Tool as much as I do?

Kaleidoscopes

05 Monday Aug 2013

Posted by Enjolivure in Scrapbooking

≈ Leave a comment

Tags

kaleidoscope

KaleidoscopeNine years ago we went to the beach and I used this photo of my tanned beauty to make a kaleidoscope for the last page of her book. A kaleidoscope could be used for anything from filling the cover of a book to a small embellishment on a page. A page from a magazine inspired one page of my Easter layout this year and that started this whole kaleidoscope thing!kaleidiscope inspiration.bmp kaleidoscope filled with paperUse these two templates to make your own designs. (Use the Wand in the Cut & Fill Tab to separate the colors and fill with paper or color.)
kaleidoscope 16 kaleidoscope 8

To make a photo kaleidoscope, download this template and remove the white triangle to create a negative (Cut & Fill Tab, Wand, select triangle, Cut). Change the color of the negative if your photo has a similar shade of blue in it. Choose a color that is very different from the colors in your photo to make sure the wand can do its job!kaleidoscope negativePlace the photo behind the negative and position it, rotating if necessary.kaleidoscope square redo Select the photo and the negative and flatten (Arrange Tab) them together. Wand away the negative. Duplicate the photo (Home Tab, Copy, Paste). Make the second photo a mirror image of the first and rotate it (Arrange Tab, Rotate Section, Flip Horizontally, rotate 90 clockwise). Flatten the second photo and line it up horizontally and vertically with the first photo (Arrange Tab, Align Left and Bottom). Flatten the two together.kaleidoscope twoDuplicate the new set. Rotate the second set 90 degrees clockwise. Flatten. Line up with the first set. Line up on the left side using the Align option. Zoom in and use the arrows to position the two pieces to just meet. Flatten the two together. Duplicate the new piece (which is now half of the final project). Flip it horizontally. Line up the tops using the align tool. Zoom in and use the arrows to position the two pieces to just meet. Flatten the two together.kaleidoscope fourThere are a few different ways to finish the edge. You can leave it as is or save it as a photo (Right-click, Save Selection, Export to Image File and then bring it back onto the page as a photo from your computer) if you want to add a mat (see my previous post about that).kaleidoscope fiveIf you want to cut a shape out of the final product, center it on the page and click on the side and top rulers so you will have lines cutting through the middle both horizontally and vertically. kaleidoscope six.bmpWhen you select the shape (Cut & Fill Tab, Shapes) be sure to click on Use Original Aspect and use the arrow keys to nudge the shape cutter centrally on the kaleidoscope.

Writing in the Sand

23 Tuesday Jul 2013

Posted by Enjolivure in Scrapbooking

≈ Leave a comment

Tags

beach, sand, summer

writing in the sandSome time ago, one of my friends asked me to help her create a title on a photo of the beach that looked like it had been written in the sand. I don’t recall exactly how it turned out but I recently took some time to come up with something which is hopefully a bit better.

Create the Title: Insert Tab, Text Shape, Text: your title, Font: Segoe Print in Bold and Italics, Fill: Fill the shape with a solid color, sample the sand in your photo and then click on HSB and make it darker, Line Color (Outline): Sample, match the sand and use HSB to make it a little bit darker, Line Width: 3/16″, Create. (The Line Width or Outline should be set so that the basic title is totally visible but still as narrow as possible. This will vary with the length of the title and the font, if you choose to use a different one.)

Separate the letters from the outline: Cut & Fill Tab, Wand, hold down Shift key to select each letter, Keep Both Areas, Cut.

Select the outline. Format Tab, Surface, Concrete, Magnification and Contrast to the far right, OK. Format Tab, Filters, 3D: Amount 80, Softness 100, Width 20, Apply.

Flatten the lettering and the outline together: Select one then hold Shift key to select the other, Arrange Tab, Flatten. Format Tab, Filters, Soften Edge: 25, Apply.

Keep in mind that you may need/want to tweak the settings that are suggested. Please post your results if you try this technique!

Carving Wood

23 Tuesday Jul 2013

Posted by Enjolivure in Scrapbooking

≈ 1 Comment

Tags

Father's Day, masculine, wood

carving woodA title on the Creative Memories Go Digital Fan Page on Facebook looked like it had been routered out of the wood and so I took up the challenge to duplicate the effect.

Insert 2 pieces of wood (Digital Embellishments – Elements, Wood Texture). Create the title (Insert tab, Text, I used the Impact font) and flatten it to top piece (select both holding the Shift Key, Arrange tab, Flatten) and then remove the title using the Wand (Cut & Fill Tab, Wand, hold the Shift key to select each letter, Cut). Add a 3D filter (Format tab) with the following settings: Amount 128, Softness 5, Width 10, Apply. Add a heavy shadow (Format tab). Flatten (Arrange tab). Add a heavy shadow again. Flatten. Add a heavy shadow from the opposite direction (Format tab, Shadow options). Make the second piece of wood darker (Color tab, Brightness & Light, slide Brightness to the left as far as you want.)

Think Outside the Storybook

10 Friday May 2013

Posted by Enjolivure in Misc., Scrapbooking

≈ Leave a comment

Tags

scallops, sew, skirt

I’ve said it before; I’ll say it again: I use CM for way more than scrapbooking! Katie found a very cute skirt sold by J Crew but the skirt was too short and the price tag was rather high (especially for a seamstress). Of course, I looked at it and said, “I could make that.” It is just two squares with pockets and an elastic waist. For this skirt, I went to the extra trouble of making a scalloped hem which is very popular with Lilly Pulitzer clothes this summer. Perhaps I could have just taken some mugs or bowls and traced along a line to make the scallop pattern but it was more fun to create it using CM.

The process… print the pattern twice, cut up the middle, cut out the scallops, tape the pieces together overlapping the scallops, finish the straight hem with the serger before turning it to the right side, pin the hem (rights sides together), trace the scalloped hem with a pencil, sew along the pencil lines, trim the fabric, turn right side out and press.

Fullscreen capture 04152013 31728 PM.bmp

It was a bit of extra work but well worth it considering the final cost was only about $15.IMG_0228

Don’t See What You Need? Try Manipulation!

01 Monday Apr 2013

Posted by Enjolivure in Scrapbooking

≈ Leave a comment

Tags

mat, scallop, shapes

Don’t let what you see in your choice of elements limit you. For example, this shape is the perfect mat for a square photo but you happen to need a rectangle.Shape one

However, if you stretch it out to a rectangle, the scallops are stretched out. This does not look right! There is a way to get around it with this shape and several others (but obviously not all of them).
Shape Two

1. Insert, Shape from Content Section, From art kit, Decorative Cardstock Digital Shapes, Shape 14.

2. Duplicate the shape and change the color.

Shape Three

3. Zoom in and line up the scallops while creating the rectangle size needed.Shape Four

4. Flatten the two elements together and fill with color, paper or a photo.

Now, THAT was easy!

Getting into Shape

04 Monday Mar 2013

Posted by Enjolivure in Scrapbooking

≈ Leave a comment

Tags

custom shape, shapes

getting into shapeI have recently been trying to figure out this whole shape creation thing. Here’s an example that I hope will inspire you to create your own shapes!

Shape Maker One

Insert, Content Shape, From art kit, select square. Insert, Content Shape, From art kit, select circle (fill with a different color). Hold down the shift key to make it smaller without losing the original perfect circle aspect ratio.

Select the circle, Cut & Fill, Grid with 4 squares, spacing set a 0, OK.

Shape Maker Two

Move the yellow quarters to each corner of the square using the options under Align to get them just right. Select all five pieces and Flatten (Arrange tab) so they become one element.

Select Cut & Fill, select Wand and click on each yellow section (hold the Shift key to select more than one section at a time) and cut. Unfortunately, sometimes a little bit of clean-up is needed after cutting shapes like this. If you still see a faint outline of where the circles were, remove them using the Cut & Fill tab.

Now that the template has been created, it has to be re-created to be saved in your Shapes file.

Fullscreen capture 03042013 40300 PM.bmp

Insert, Shape, Custom shape using straight lines. Recreate the shape by clicking around the perimeter. Make sure to select a different fill color so it will be easy to copy. It doesn’t have to be perfect at first. Zoom in to 200% to edit the points more precisely. Before clicking create, select Save in Personal Art Kit. (This does seem like a bit of work but it’s easier than using the Shape Creator in the Content Manager.)

Shape Maker Three

To use, click on the Content tab (right side of screen), go to your content and you should find it in Shapes. For this example, I filled it with a gradient (Cut & Fill tab) and added a 3-D edge (Format, Filter) and a shadow.

If you want to make a photograph this shape, select the photo, Format Photos, Select Mat, make the mat fill transparent and select this shape from the cutout option. The nice thing about shaping your photo this way is that it maintains the qualities of a photo and you can crop, zoom and move it around to get it just right. If you want to mat it, use a two or three-mat option but the largest mat always needs to be transparent. See my post regarding shapes and this post specifically about round photos for additional details.

CM Does it Again! Another Non-Scrapbooking Application.

18 Friday Jan 2013

Posted by Enjolivure in Misc., Scrapbooking

≈ Leave a comment

Tags

floor plan, rearrange furniture

You can use Creative Memories to help you rearrange a room! Our den has been the same for over five years and it was time to make a change. Seeing as we, like most people I’m sure, have several pieces of fairly heavy furniture in our den, I wanted to make a plan before I started the grunt work of moving things around.

Naturally, the first thing I did was measure the room. Quite surprisingly, it was within inches of being square. I measured the furniture and made scale models on CM. (I switched the measuring unit to metric and then took the number of inches of the actual furniture, doubled it and used that as my amount of millimeters.) It was so easy to create these pieces and move them around.

I actually came up with this plan some time ago but it wasn’t until two days ago, while home alone, that the change took place. We all like it but it still needs a little bit of tweeking.

den

← Older posts
Newer posts →

Recent Posts

  • 12-Block Scrapbooking
  • A Personalized Sleeve for a Coffee Cup
  • When Outlined Text Shapes Overlap
  • Front & Center
  • Safeguard Your Scrapbooks!

Archives

  • May 2016
  • November 2015
  • October 2015
  • June 2015
  • March 2015
  • November 2014
  • July 2014
  • March 2014
  • December 2013
  • November 2013
  • October 2013
  • August 2013
  • July 2013
  • May 2013
  • April 2013
  • March 2013
  • January 2013
  • December 2012
  • October 2012
  • September 2012
  • August 2012
  • July 2012
  • June 2012

Categories

  • Family
  • Misc.
  • Scrapbooking

Enter your email address to follow this blog and receive notifications of new posts by email.

Join 24 other subscribers

Follow my Blog!

  • RSS - Posts
  • RSS - Comments

Blogs I Follow

  • Inside Stitch: The Official Vera Bradley Blog
  • Ordinary Days
  • WordPress.com News

Create a free website or blog at WordPress.com.

Inside Stitch: The Official Vera Bradley Blog

Ordinary Days

Finding beauty, joy, and simplicity in the everyday moments

WordPress.com News

The latest news on WordPress.com and the WordPress community.

Privacy & Cookies: This site uses cookies. By continuing to use this website, you agree to their use.
To find out more, including how to control cookies, see here: Cookie Policy
  • Follow Following
    • enjolivure
    • Already have a WordPress.com account? Log in now.
    • enjolivure
    • Customize
    • Follow Following
    • Sign up
    • Log in
    • Report this content
    • View site in Reader
    • Manage subscriptions
    • Collapse this bar
 

Loading Comments...